Adding Voicelines
Learn how to add new voicelines to the game.
Make sure you have followed the prerequisites page to install the necessary tools before proceeding. Note that opposed the guidance in Adding Sounds & Music, you do not need the template project linked there in order to add voicelines to the game.
You can refer to the work-in-progress Hades in Hades II mod as an example of how to add voicelines to the game using this method. This project is very extensive and goes way beyond the scope of adding voicelines, so please replace this reference with another mod if you come across one that is more fitting!
Basics
In Hades II, voicelines are stored in <SpeakerName>.fsb files, with supporting <SpeakerName>.txt files that define the order of voicelines in the corresponding .fsb file, we'll call these two files together the "voiceover files" for a speaker.
Voiceover files exist per speaker, and can have different variants for different contexts as well, e.g. there are MelinoeField and Melinoe voiceover files, in the context of being in the Hub/Crossroads, or in a run.
Voiceover files are stored in the Content/Audio/Desktop/VO folder in your Hades II installation.
Creating voiceover files
Voice bank names are normalized by the engine, and hence must be formatted in a certain way to be discoverable:
- The first letter of your voice bank may be capitalized, e.g.
Authornamemodnameandauthornamemodnamewould both load successfully. - All following letters must be lowercase, e.g.
AuthorNameModNamewould fail to be discovered. - Exception: If your voice bank name contains the substrings
FieldorKeepsake, these must be capitalized, e.g.Authornamemodnamekeepsakewould fail to be discovered, whileAuthornamemodnameKeepsakewill be discovered. - You should always prefix your voice bank name with your
Authornamemodnameto prevent any potential conflicts and duplicates with other mods.
Hell2Modding will log a warning at startup if it detects a voice bank name that would fail the engine's normalization, so check your logs if cues aren't playing.
For this guide, we will use the speaker name Megaera as an example.
Prepare your voicelines
Voicelines you want to add to the game should have the following format:
Megaera_0053.ogg
Megaera_0057.ogg
Megaera_0061.ogg
The specific numbers do not matter (you do not need to have these ascending, and numbers in between can be missing), but try to adhere to the four digit numbering style that Hades II uses.
It's possible that the base assets do not have to be .ogg files to start with (before importing them into FMOD Studio), but it is recommended.
All voiceover event names in FMOD Studio MUST start with the speaker's exact name, followed by an underscore _, otherwise the game will not be able to look them up at runtime!
The part after the _ does not need to be numeric - any string works (e.g. Megaera_BattleCry0001).
Create an FMOD Studio project
Create a new project in FMOD Studio and create a folder with the name of your speaker (Megaera).
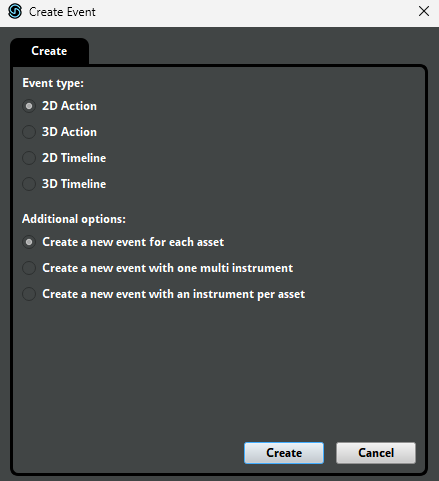
Import your voicelines into this folder, with each asset being imported as a new 2D event:
Now, right-click your folder name, and select Assign to Bank -> New Bank....
Name this bank the exact same as your speaker name (Megaera).
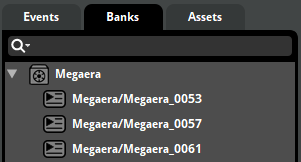
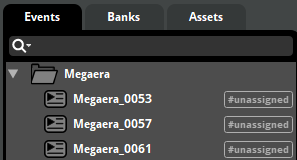
You should now see the previous #unassigned tag disappear from the events in your folder, and all events having been added to the bank with the speaker's name.
Repeat this process for each different speaker you want to add voicelines for.
You can now build your project through File -> Build to create a .bank file for each of your speakers in the Build/Desktop folder of your project.
Convert .bank files to .fsb and .txt files
Extract the .bank files you created in the previous step using FMOD bank tools, which will create a .fsb file for each .bank file in the fsb output folder, and a folder containing the voicelines as .wav files (we do not need these), as well as a .txt file - in the .wav folder.
The .fsb file is the voiceover file for your speaker, which you can use as-is in your mod.
In our example, we will create a data/Content/Audio/Desktop/VO folder for our mod, into which we can place the Megaera.fsb file.
The contents of this folder will be added to the plugins_data folder in our Thunderstore mod package.
You will need to convert the contents of the .txt file to the format expected by Hades II.
The file created by FMOD bank tools will contain each asset/filename (voiceline) on a new line, in the order they were added to the bank by FMOD Studio.
If you renamed your events in the project, the names in the .txt file will be the original names of the assets, not the renamed ones.
As long as the event name in FMOD Studio matches the folder, bank and speaker name, the game will load the correct events if if the original filename was different.
Do not change the names in the .txt file.
The voicelines may be in a different order in the .txt file than they were in FMOD Studio, but you must not change the order of the voicelines in the .txt file, as this will cause the game to play the wrong events.
The original file may look like this:
Megaera_0053.wav
Megaera_0061.wav
Megaera_0057.wav
In our example, the game would expect the .txt file to have the following format:
#ifndef _Megaera_H
#define _Megaera_H

#define Megaera_0053 0
#define Megaera_0061 1
#define Megaera_0057 2

#endif
- The
#ifndefand#definelines must be added with the speaker name in the_SpeakerName_Hformat. - For each asset/voiceline, the line must start with
#define, followed by the original filename (without the extension), and the index of the voiceline in the.fsbfile, starting from 0. - The
#endifline must be added at the end of the file.
The following snippet is a Powershell script you can use to automate the conversion of the .txt file:
# Bank name that is being looked at
$speakerName = "Megaera"
# Reading the input .txt files directly from the output created by FMOD bank tools
$inputFile = ".\Fmod Bank Tools\wav\$speakerName\$speakerName.txt"
# The output file that will be created
# This path would work if you have a data directory in the parent folder of this script
$outputFile = ".\..\data\Content\Audio\Desktop\VO\$speakerName.txt"

# Reading the input file
$content = Get-Content $inputFile
$lineCount = $content.Length

# Add the two header lines with the speakerName
$header = @("#ifndef _${speakerName}_H", "#define _${speakerName}_H", "")

# Translate the event names to the expected format
for ($i = 0; $i -lt $lineCount; $i++) {
  $line = $content[$i] -replace '\.wav', ''
  $content[$i] = "#define $line $i"
}

# Combine the header, the modified content, and add the footer
$footer = @("", "#endif")
$finalContent = $header + $content + $footer

# Write the final content to the output file
$finalContent | Set-Content $outputFile
Load voiceover files in your mod
Place voiceover files in your mod
Place your .fsb and .txt files anywhere in your mod's plugins_data folder (they must be co-located - same directory, same filename stem).
Hell2Modding automatically discovers and registers all .fsb files and their .txt companions at startup.
For example:
plugins_data/
  AuthorName-ModName/
    Content/Audio/Desktop/VO/   <- recommended location following Hades II directory structure, but not required
      Authornamemodnameposeidon.fsb
      Authornamemodnameposeidon.txt
Load voiceover files at runtime
In your mod, you can load voiceover files by name using the LoadVoicebanks(speakerNames) function.
speakerNames is a table of strings, where each string is the name of a voiceover file (speaker) to load.
game.LoadVoicebanks( { "Megaera" } )
If you want to load all voiceover files for a speaker, you can also use the following wildcard syntax, e.g. if you added Megaera and MegaeraField voiceover files, you can use:
game.LoadVoicebanks( { "Megaera*" } )
which will load all voiceover files that start with Megaera.
The wildcard can be placed at the start or end of the string.
In-game, you can reference voicelines by the event name in FMOD Studio, prefixed by /VO/, e.g. as such:
local megaeraVoicelines = {
  {
    RandomRemaining = true,
    PreLineWait = 0.25,
    Cooldowns = {
      { Name = "MegaeraSpeechCooldown", Time = 10 }
    },

    { Cue = "/VO/Megaera_0053", Text = "{#Emph}Tsch!" },
    { Cue = "/VO/Megaera_0057", Text = "Hmph.", PlayFirst = true },
    { Cue = "/VO/Megaera_0061", Text = "Hmm." },
  },
}

game.thread(PlayVoicelines( megaeraVoicelines ))
...or add the new cues to existing voiceline tables.
As of yet it is unclear how to add substitles for custom voicelines. If you find a way to do this, please update this page!