Using the Mod template
Please ensure you've read the Introduction before starting this guide.
Setting up a local copy
In this first part of the guide, you'll learn how to clone and set up your own copy of the Hades II Mod template, as well as understand it's contents and basic layout.
To get started, navigate to the latest release of the Hades II Mod template, and download the hades2-mod-template.zip.
Unzip the contents of this folder to where you'll be doing your mod development, open it in your chosen code editor and push the contents to a new GitHub repository.
It's recommended to create a symlink from your mod development folder to the ReturnOfModding folder used by r2modman, as described in the Development Environment guide.
Creating a Thunderstore team
To publish your mods to Thunderstore, you need to create a Team. This is the name shown as the mod author on your mod page, and will be part of your mod's unique identifier on Thunderstore. A mod's team (just like its name) cannot be changed after publishing, so choose wisely.
To make use of the release workflow included in the mod template, you will also need to create a Service Account for your mod, and add its API token as a secret in your GitHub repository:
-
To create a team, first sign up for a Thunderstore account, on the top right. You can choose to sign up using your GitHub account, which is recommended, or a Discord or Overwolf account.
- After signing in, go to the Teams settings on Thunderstore and create a new team. New options should appear in the left sidebar.
- Create a new Service Account for your mod (we recommend using the same name as the mod name, to keep service accounts separate from each other and easily identifiable).
- You will get an API token associated to the new Service Account. Copy this token now, as it will not be shown again. If you lose it, you will need to remove and recreate the service account.
-
In your GitHub repository:
- Go to Settings > Secrets and variables > Actions.
- Create a new repository secret named
TCLI_AUTH_TOKENand copy/paste the API token as its value.
Understanding the components
You can learn more about each of the core files in the template by expanding the sections below:
thunderstore.toml
Click to expand section
This file contains all of the metadata required for publishing your mod to Thunderstore. You can find the full specification for both the contents of this file and other parts of your mod package in the Thunderstore package format requirements online.
[config]
This contains the schema version of the thunderstore.toml file.
You should not need to change this.
[package]
namespace: This is your Thunderstore team name, which is the author name shown on your mod page. Once set, this cannot be changed without creating a new team and republishing your mod.name: The name of your mod. Like the team name, this cannot be changed for an already published mod. It cannot contain spaces or any special characters besides underscores. Underscores are converted to spaces for display purposes on some views (like the mod browser).versionNumber: The version of your mod, which should follow Semantic Versioning. Thunderstore only supports theMajor.Minor.Patchformat.description: A short description of what your mod does. It is shown in the mod browsers online and in r2modman. Cannot be longer than 250 characters.websiteUrl: A URL to your mod's website (e.g. your GitHub repository). It is highly recommended to include your GitHub repository here, as this is the primary way for users to file bug reports and leave feedback, as Thunderstore does not have discussion or comment functionality. If you don't have URL, leave this as an empty string"".containsNsfwContent: Whether your mod contains any NSFW content. All mods with NSFW content must be marked as such. NSFW is a search filter on Thunderstore that must be explicitly enabled by users.
[package.dependencies]
This should be a list of mods that your mod depends on to function. The mod template already contains a list of dependencies that will be required by most mods. You should not have to remove any of these, unless you know for certain you do not require them. These dependencies will already be installed by most users through other mods, so having them listed here will not cause any issues.
If you need to depend on a new mod, you can add it here as "AuthorName-ModName" = "version".
Note that this is not a pinned version, and by default, Thunderstore will always get the latest version of any dependency.
So if a later version of one of your dependencies breaks your mod, this will not prevent users from updating to that version.
[build] sections
The [build] section defines what files are included in your mod package when you publish it to Thunderstore.
The icon, readme and outdir fields should not be changed.
The [build.copy] sections define fieles and directories that are copied from your source folder into the built mod package.
The two most relevant of these are the ./src folder being copied to ./plugins, and the ./data folder being copied to ./plugins_data.
You must not change the target folders, as these are used by the mod loader to discover your mod.
You may change the source folders if required.
Copying the ./data folder is commented out of the template by default, as it doesn't include any data files (such as .pkg packages or .bank sound files).
Change this if your mod includes these.
[publish] sections
You must not change the [publish] section, as this defines that your mod will be published to the Hades II community on Thunderstore.
You may add additional, existing tags to the [publish.categories] list if you wish.
See the Thunderstore API for a full list of available categories.
Readme.md, Changelog.md, License & icon.png
Click to expand section
The Readme.md should contain a description of your mod, alongside any possible configuration option (see config.lua below).
The contents of the Readme will be shown on the Thunderstore mod page.
If you link any images in the Readme, these must be URLs, as relative paths to files in your repository will not work.
The Changelog.md should contain a list of changes made in each version of your mod.
A short guide on how to use the file is included in the template - remove this guidance before publishing.
In the LICENSE file, replace the [year] and [fullname] placeholders.
By default, the template ships the MIT license, which is recommended to use in this community.
The icon.png is the icon shown for your mod on Thunderstore and in r2modman.
It must be a 256x256 PNG icon.
.github/workflows/release.yaml
Click to expand section
This file contains a GitHub Actions workflow that builds and publishes your mod package to both GitHub and Thunderstore. To release a new package version, follow these steps, first follow the Creating a Thunderstore team guide and create a service account as shown there.
- To trigger a new release, from your GitHub repository go to Actions and select the Release workflow on the left.
- Select the Run workflow dropdown on the right.
- By default, your repository's default branch (
mainby default) is selected. If you want to release from another branch, select it.
- By default, your repository's default branch (
- Input the version to release, e.g.
1.2.0.- For good practices on versioning, please see Semantic Versioning.
- Click the Run workflow button.
- A new workflow run will be triggered, and will take care of:
- Rotating version in
CHANGELOG.mdandthunderstore.toml. - Building the Thunderstore mod package.
- Uploading the package to the workflow run as an artifact.
- Pushing the changes and tagging the git repository.
- Publishing the package on Thunderstore.
- Making a new GitHub release.
- Uploading the package to the GitHub release as an asset.
- Rotating version in
- After a new release has been published, you should
git pullthe changes to ensure your localCHANGELOG.mdandthunderstore.tomlare up to date.
The data folder
This folder is not included in the template by default, as it doesn't have any files that would go in here.
If your mod distributes any binary files, such as .pkg asset packages or .bank sound files, they should be placed in this folder.
When building your mod package, this folder will be copied to plugins_data, which is where the mod loader looks for these files (remember to uncomment the relevant section in the thunderstore.toml file).
The src folder
The src folder is where your mod's code goes.
The template already contains boilerplate code to integrate your mod with Hell2Modding, our mod loader for Hades II.
main.lua
Start by opening the main.lua file.
This file contains the entry point for your mod, and contains a number of boilerplate definitions and assignments that you should not change.
How all of these work in detail won't be covered in this guide.
The most relevant parts for you are the on_ready() and on_reload() functions.
These two functions are where you should import any other lua files you create, as is shown with the existing imports of the ready.lua and reload.lua files.
The content of the on_ready() function is run once, when your mod is first loaded, while the content of the on_reload() function is run every time your mod is reloaded (when you change one of it's files in the plugins folder).
This is why it is recommended to create a symlink from your development directory to the plugins directory, as that way you can make changes to your mod without needing to rebuild the package and restart the game to see them applied.
ready.lua and reload.lua
Let's take a look at what the ready.lua and reload.lua files currently do in the template:
- From
ready.lua, it uses thesjsondependency library to "hook" into the game'sShellText.en.sjsonfile, which contains text that is e.g. displayed on the main menu of the game.- Localization files are located in
Game/Text/<languageShorthand>/<fileName>.<languageShorthand>.sjson, and you need to hook into each one separately if you want to modify their contents. - This hook is executed when the game loads the file, which is done only once on game start.
- It passes the data to
sjson_ShellText(data), which is defined inreload.lua, and which will modify the text shown on thePlaybutton on the main menu. - The
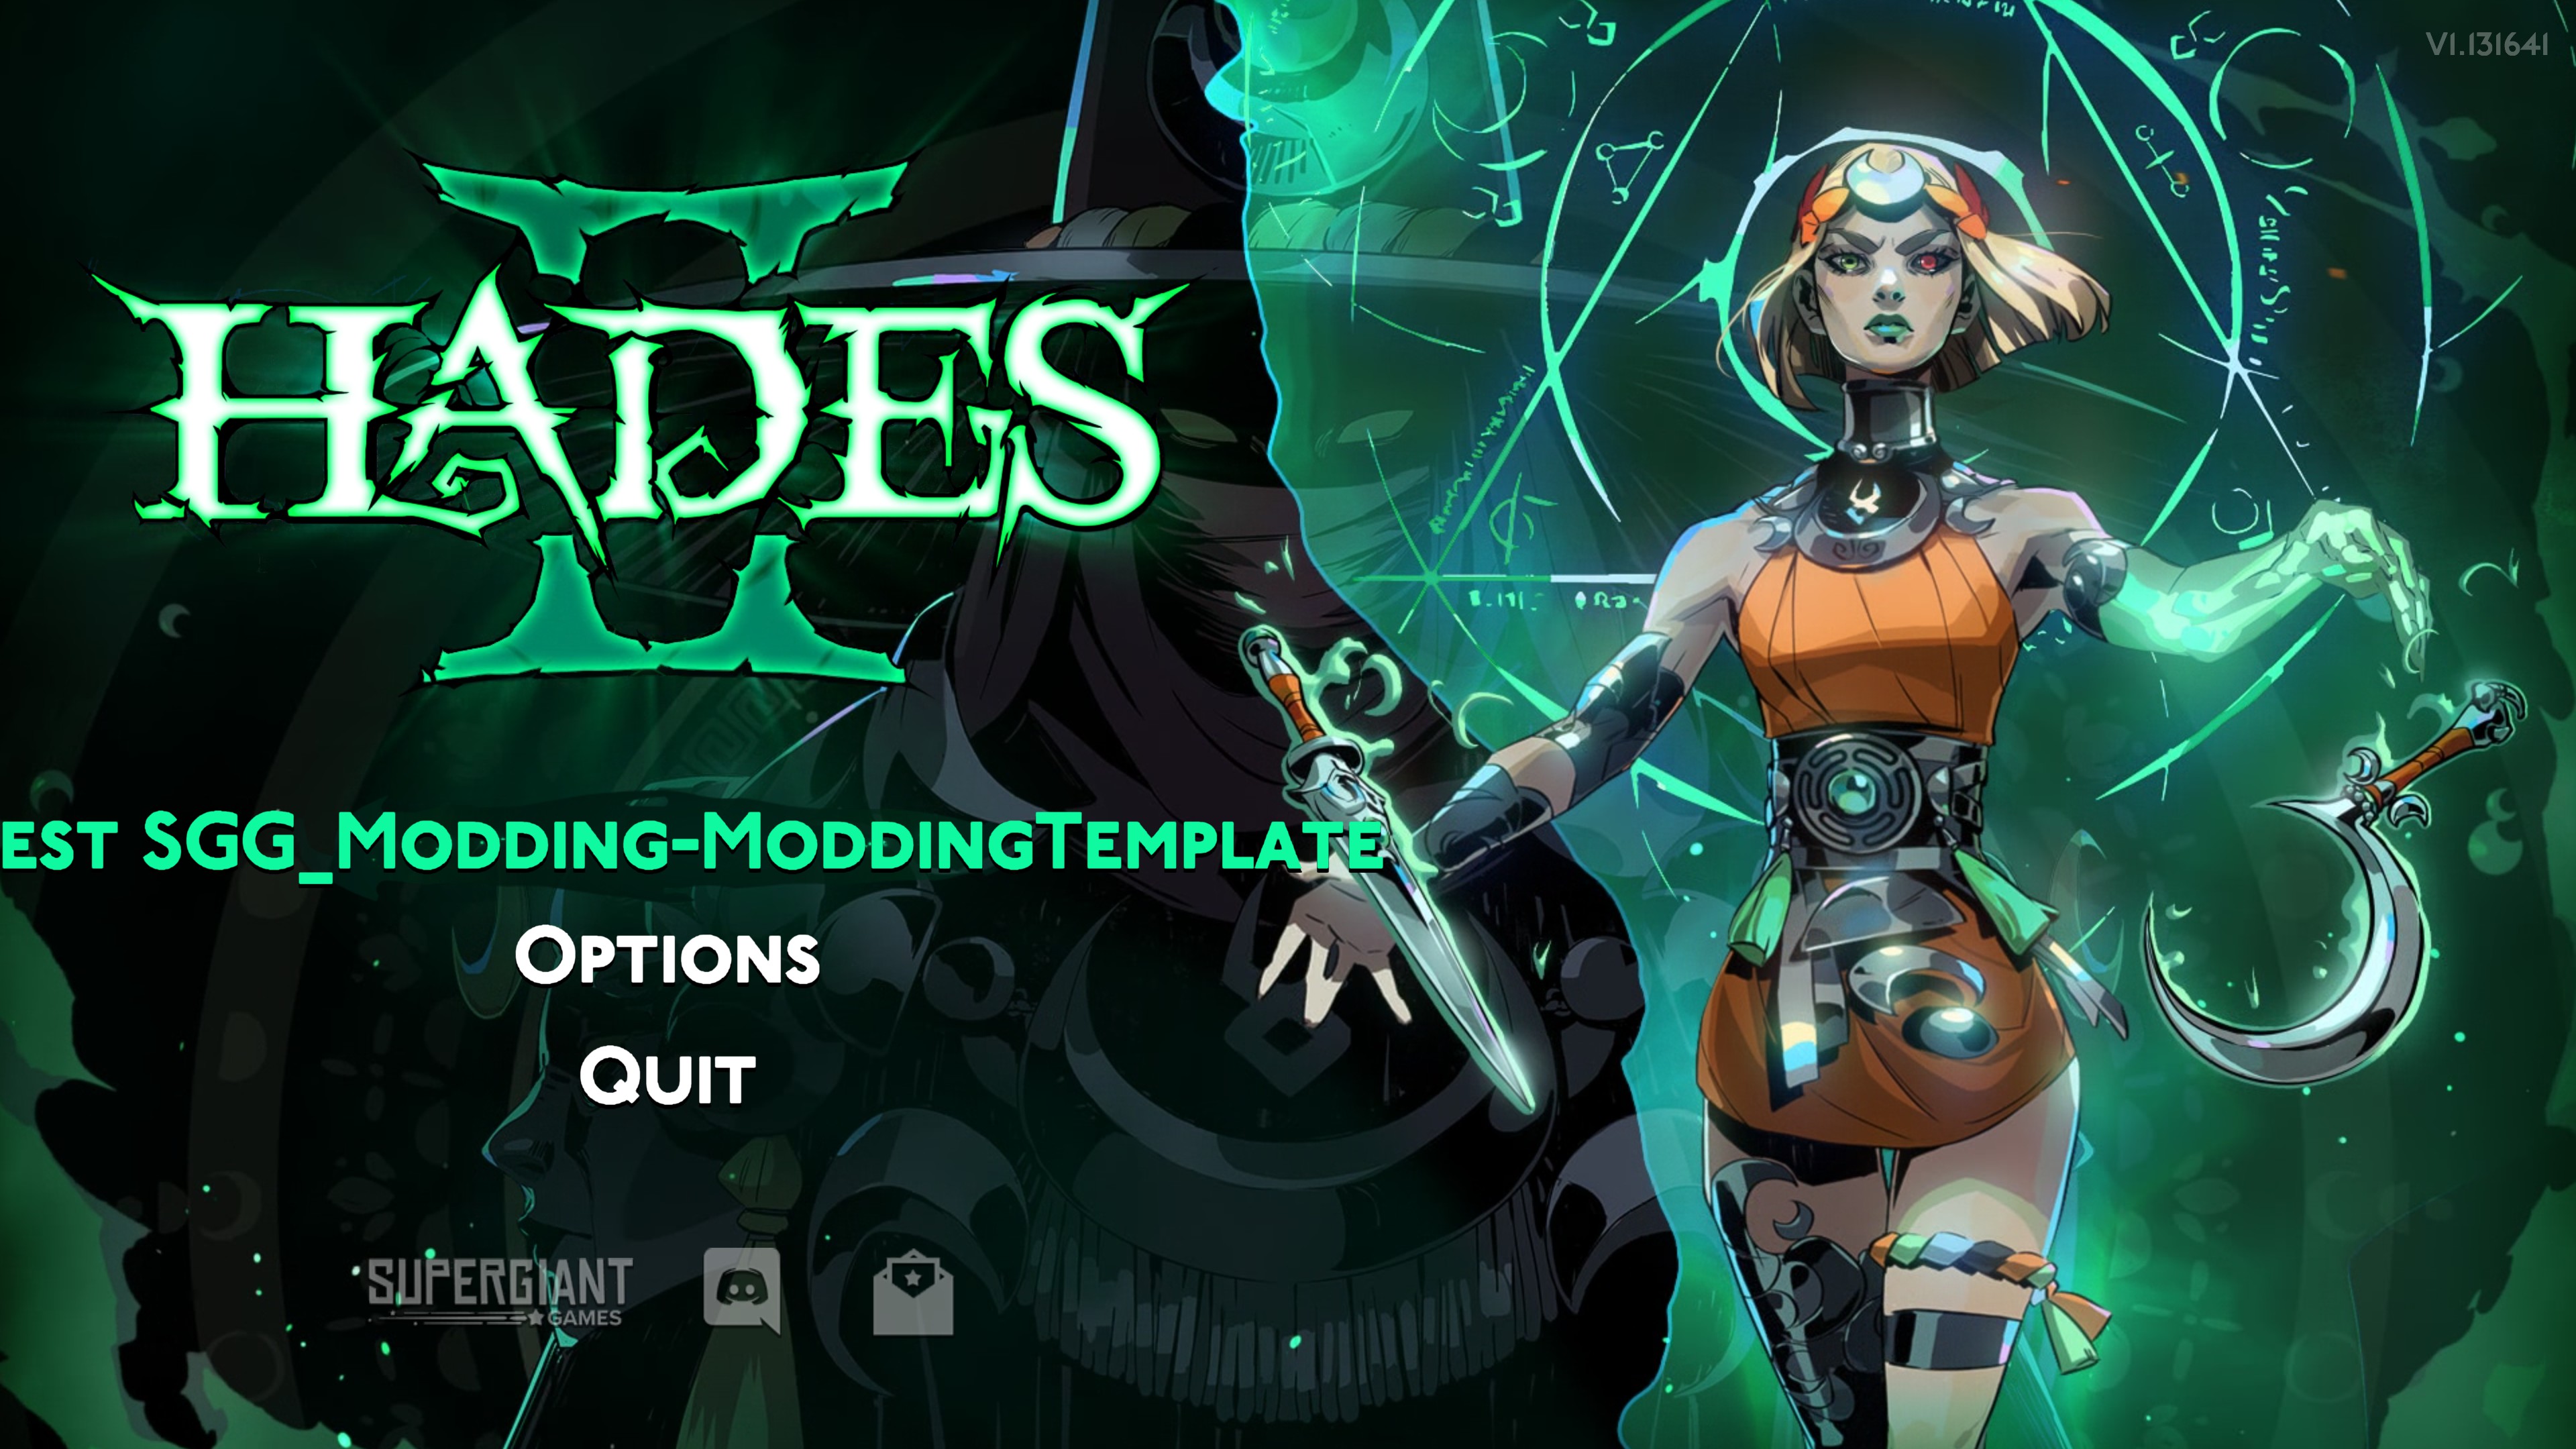
_PLUGIN.guidreferenced in this modification is theAuthorName-ModNameunique identifier of your mod. - When you locally install your mod, loading into the main menu should now show
Test <AuthorName-ModName>instead ofPlay:
- Localization files are located in
- From
ready.lua, we also "wrap" the functionSetupMap(), which is defined by the game.
- In
function(base, ...),baseis the original function, and...are any arguments passed to it.- In a wrap, you should always call the original function either before or after your own code, depending on the modification you need to make. Otherwise the original function will not be executed at all. If this is what you want, consider using
modutil.mod.Path.Overrideinstead. - In this case, we call the
prefix_SetupMap()function defined inreload.luabefore calling the original function. - The
prefix_SetupMap()function currently only adds a message to the log console that opens when you start the game modded, but this is where you could for example load any custom packages (.pkgfiles) required in each level. - You can wrap or override any function defined by the game through lua, but be mindful of compatibility with other mods that may also be wrapping or overriding the same functions.
- In a wrap, you should always call the original function either before or after your own code, depending on the modification you need to make. Otherwise the original function will not be executed at all. If this is what you want, consider using
- Finally, the template registers a new function call to be executed when the player presses the key mapped to the
Giftfunctionality - on keyboard, this would be theGkey by default.- When this key is pressed, the mod will execute the
trigger_Gift()function defined inreload.lua. - The original function calls the game defines to be called when this key is pressed are also executed alongside this new function.
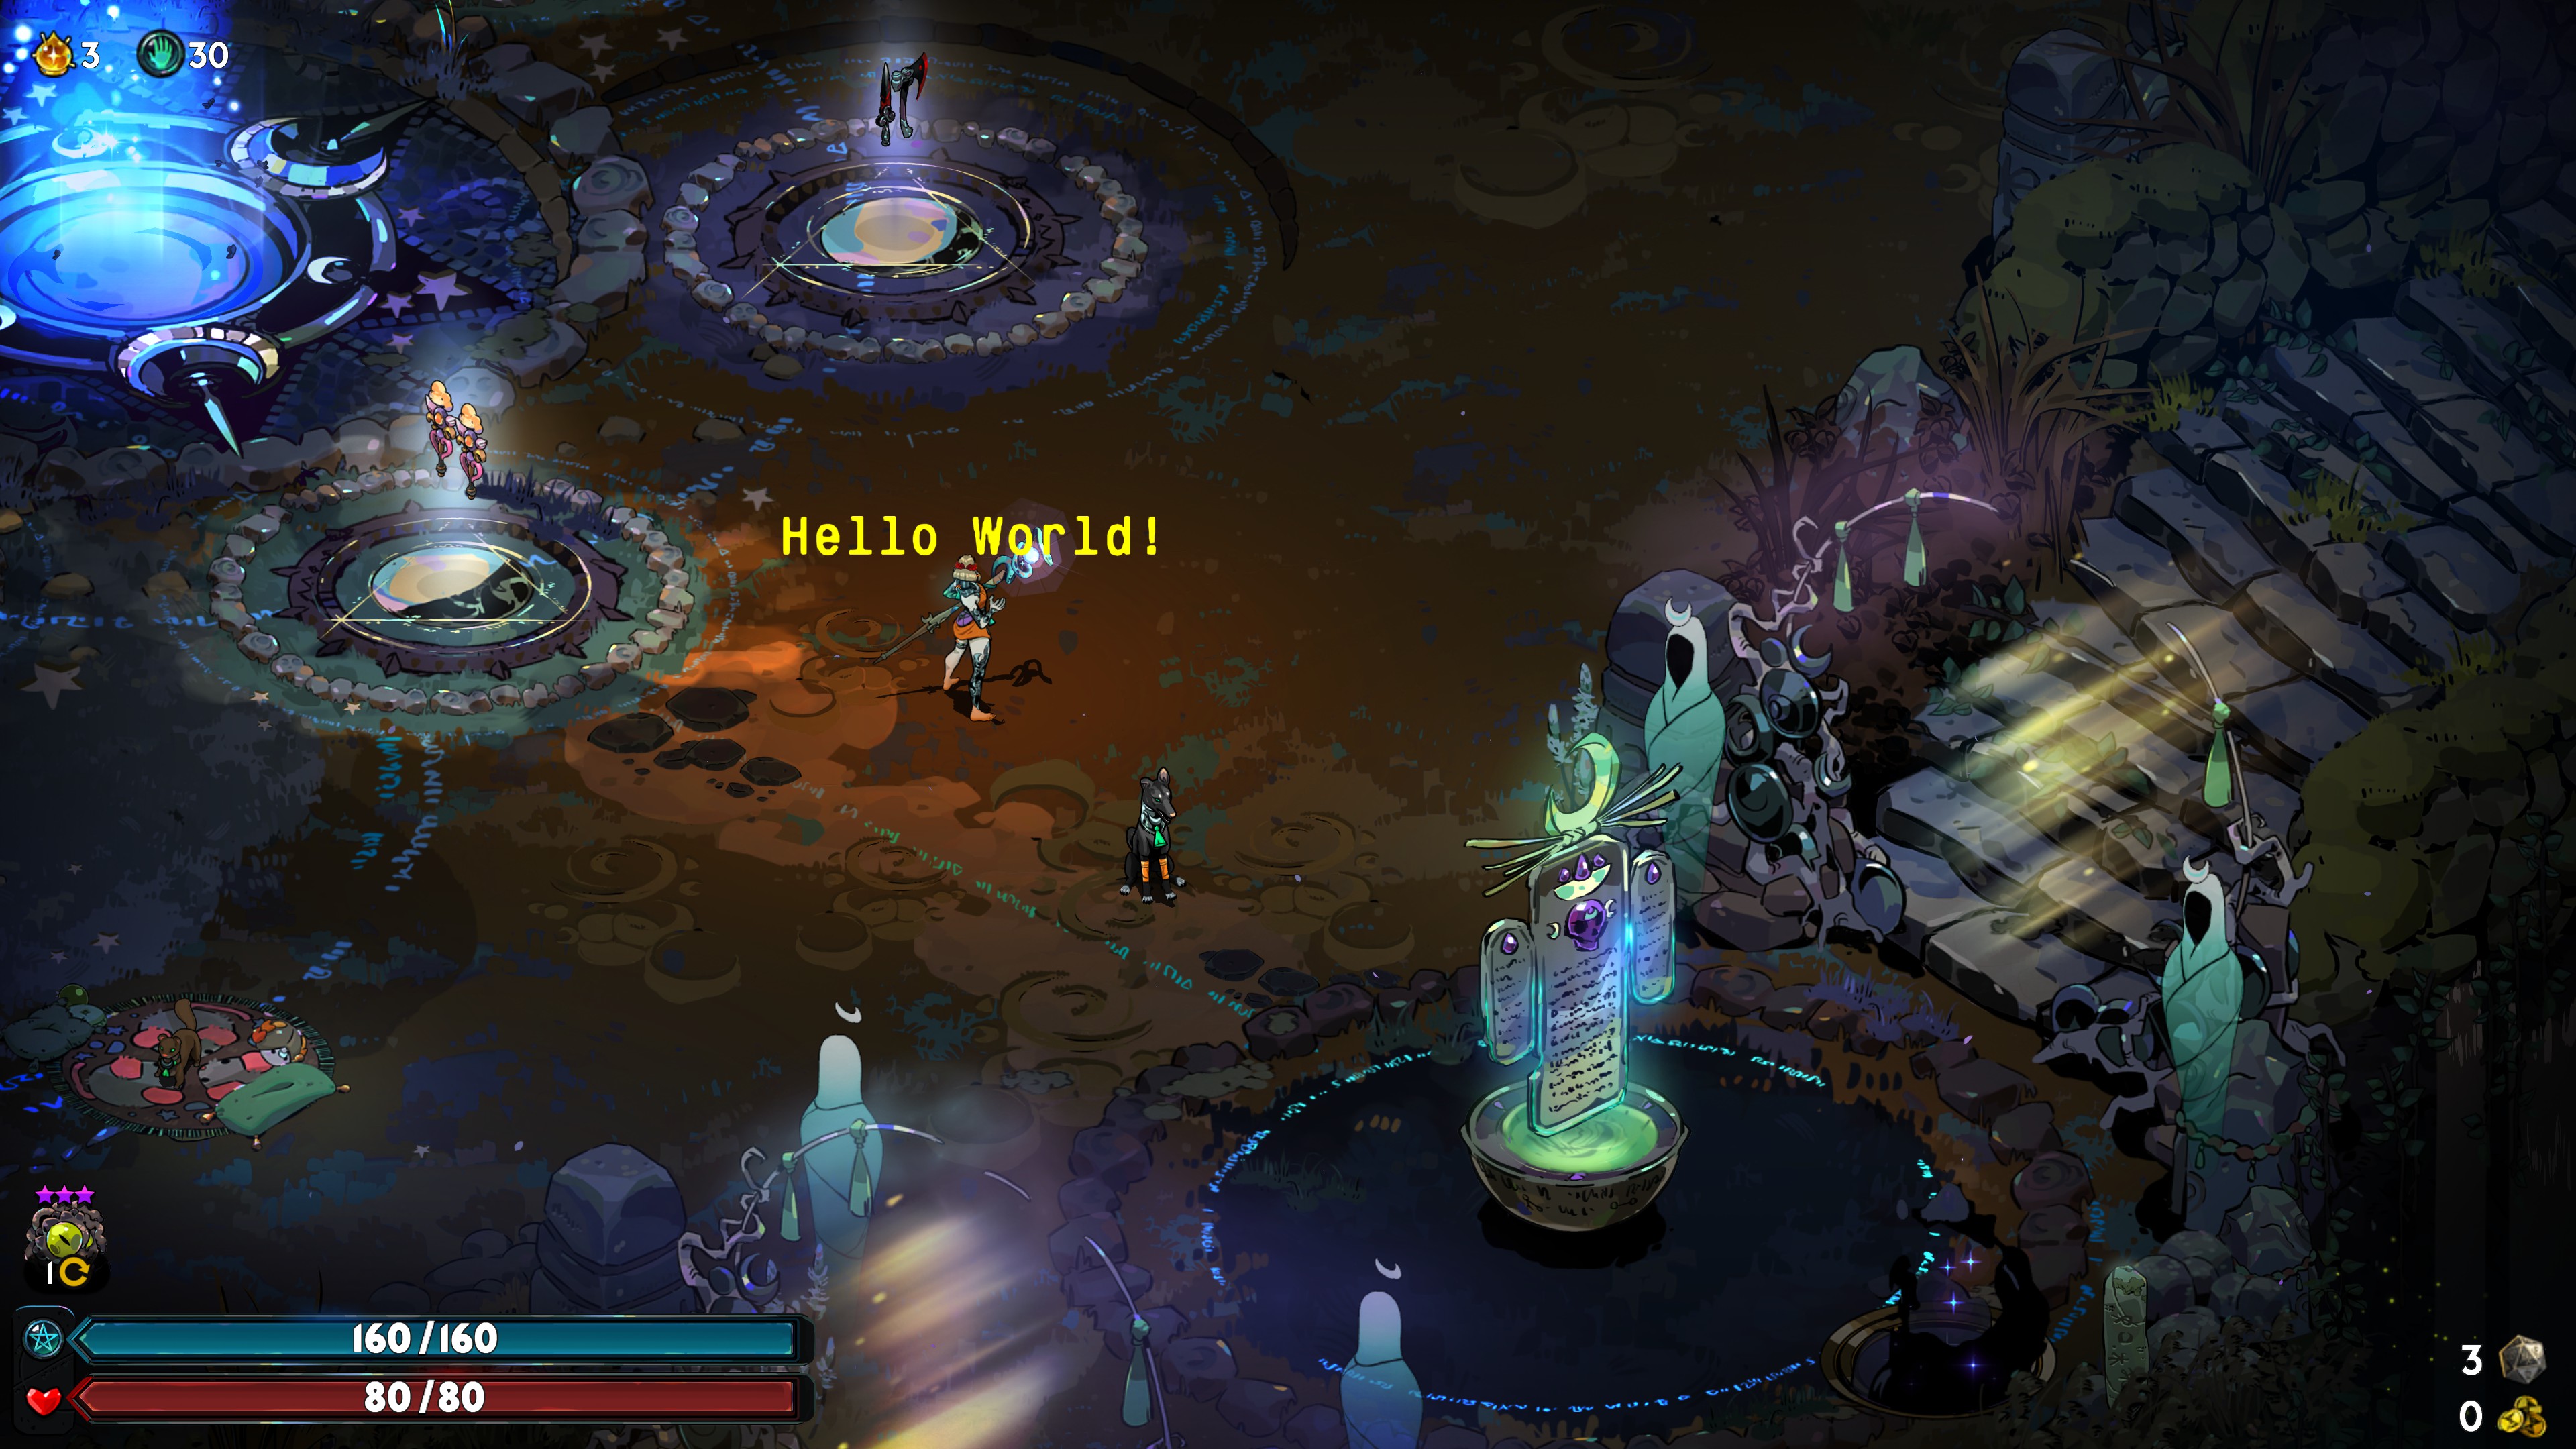
- The
trigger_Gift()function will add a log message above the player character (this call should be used for debugging only, as the game provides other functions for this to integrate more natively):
- When this key is pressed, the mod will execute the
config.lua
This file is where you should define any configuration options that users of your mod should be able to change. r2modman will automatically generate a configuration file that can be modified through the app, based on the contents of this file.
In the template, the message configuration option can be used to change what floating text is shown by trigger_Gift() when the G key is pressed.
Configuration files will persist even after your mod is uninstalled.
def.lua
Unless you are creating a library mod that exposes functions to be used by other mods, you do not need this file and can safely delete it. If you do want to expose functions to other mods, this is where you should document them.
Video walkthrough
Here is a video walkthrough of setting up a simple mod. The video goes over:
- Creating your mod starting from the template
- Running your mod locally
- Demoing the template functionality and talking through the template code
Once you've understood these basic concepts, you can continue on to the next page, where we'll create a simple portrait replacement mod using the template: Portrait replacement.